0. 概述
iSCSI 為一種通訊協定,可透過普及的網路架構如 LAN 或 VPN 協助傳送以 SCSI 為基礎的儲存指令。
使用 iSCSI Target 服務會讓您感覺電腦彷彿連接一個本地硬碟,且可透過本地端電腦作業系統來管理。
事實上,新增的磁碟是 iSCSI target 上的虛擬硬碟。
因為硬碟是虛擬的,因此不必再為電腦添加額外硬體,透過一般網路基礎架構就可管理此虛擬硬碟。
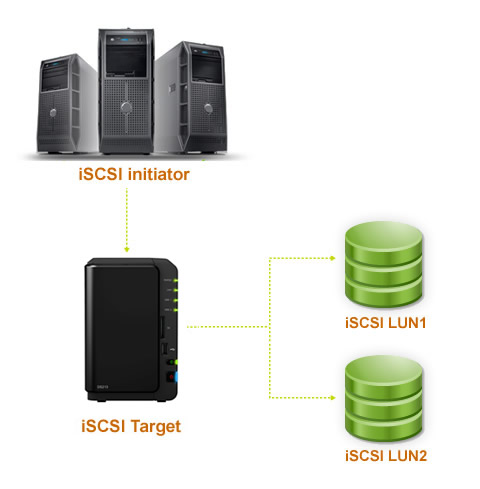
iSCSI target
Storage server side,目的在提供其他主機使用的『磁碟』,為 block level。
iSCSI initiator
Client side,能夠使用 iSCSI target 的用戶端。須安裝 iSCSI initiator 才能夠使用 iSCSI target 提供的磁碟。
經過編號的硬碟或是實體硬碟所建立的一個儲存空間,用戶可以在 iSCSI LUN 上建立並管理文件,就像管理本地硬碟一樣。
1. iSCSI target
安裝 scsi-target-utils
yum install libibverbs librdmacm sg3_utils -y

# need to download from web
yum localinstall /root/scsi-rpm/perl-Config-General-2.51-2.el7.noarch.rpm -y
yum localinstall /root/scsi-rpm/scsi-target-utils-1.0.55-2.el7.x86_64.rpm -y
Note: 假設我們已經格式化好 sdb 準備給 iSCSI target 使用
修改 tgt 的設定檔
# vim /etc/tgt/targets.conf

 <target iqn.2015-05.localdomain.localhost:testdisk>
    backing-store /dev/sdb1
    initiator-address 192.168.100.0/24
    incominguser admin admin
</target>
iSCSI Qualified Name (IQN)
- iqn.yyyy-mm.<REVERSED-DOMAIN-NAME>:<IDENTIFIER>
iSCSI LUN
- backing-store 提供的 儲存裝置 (可以多個)
initiator-address
- 限制能夠使用這個 target 的用戶端來源 (optional)
incominguser
- incominguser <USER-NAME> <USER-PWD>
啟動 iSCSI target 服務
service tgtd start
chkconfig tgtd on
查看相關埠口以設定防火牆規則
netstat -tlunp | grep tgt
查看 target 資訊以及提供的 LUN 資料內容
tgt-admin --show
新增防火牆規則開放埠口
# vim /usr/local/virus/iptables/iptables.allow
iptables -A INPUT  -p tcp -s 192.168.100.0/24 --dport 3260 -j ACCEPT
不會設定的話直接關 `service iptables stop` or `service firewalld stop`
Note: iSCSI target 主要使用 scsi-target-utils 軟體達成主要利用 tgt-admin 及 tgtadm 指令完成
2. iSCSI initiator
安裝 iscsi-initiator-utils
yum install iscsi-initiator-utils -y
修改 iscsid 設定檔
# vim /etc/iscsi/iscsid.conf

node.session.auth.username = admin
node.session.auth.password = admin
就是你剛剛設定的使用者名稱以及密碼
偵測 某IP target 的相關資料
iscsiadm -m discovery -t sendtargets -p <IP>
將所有偵測到的資訊通通寫入
ll -R /var/lib/iscsi/nodes/
啟動 iscsi 以連線 target
service iscsi restart

chkconfig iscsid on
chkconfig iscsi on
顯示出目前系統上面所有的 target 資料
iscsiadm -m node
僅登入某部 target ,不要重新啟動 iscsi 服務
iscsiadm -m node -T iqn.2015-05.localdomain.localhost:testdisk --login
查看 fdisk 會發現多了一個 sdc
fdisk -l
快樂der使用
mkfs -t xfs -i size=512 /dev/sdc
mkdir /mnt/storage; mount /dev/sdc /mnt/storage
Note: iscsi-initiator-utils 主要提供 iscsiadm 來完成所有的動作
Red Hat 的作法:iSCSI based storage pools
KVM + iSCSI
詳見:Red Hat Enterprise Linux 7 - KVM live migration
目前好像是使用 qemu-img
好像還可以用 libvert (底層使用 qemu-kvm)
0. 概述
Migration
當我們把一台 guest VM 從一台 host 實體機器遷移到另外一台 host 實體機器,稱為 migration
這是可能的,因為 guest VM 不是直接跑在實體機上,而是透過虛擬化環境。
Migration 有幾個用處:
- Load balancing
- (平均每台實體機的 loading)
- Hardware independence
- (如果要 upgrade/add/remove 硬體設備,可以安全的將guest VM遷移到別台實體機上,no downtime)
- Energy saving
- (guest VM 可以被重新分配到其他實體機上,完全沒用到的機器就可以關機省電惹科科)
- Geographic migration
- (guest VM 可以根據地理位置而遷移,來降低 latency)
Migration 的運作原理:向目的實體機傳送 guest VM 的 memory 狀態 (和任何虛擬裝置)
Note: 建議使用 shared, networked storage 來存放將被遷移的 guest VM image
Note: 同時建議使用 libvirt-managed storage pools
Note:
if the original guest virtual machine modifies pages faster than KVM can transfer them to the destination host physical machine, offline migration must be used, as live migration would never complete.
Note:
If you are migrating a guest virtual machine that has virtio devices on it please adhere to the warning explained in Important
1. LIVE MIGRATION REQUIREMENTS
(1) A guest virtual machine installed on shared storage using one of the following protocols:
- Fibre Channel-based LUNs
- iSCSI
- FCoE
- NFS
- GFS2
- SCSI RDMA protocols
(2) Make sure that the libvirtd service is enabled / running
systemctl enable libvirtd
systemctl restart libvirtd
(3) Both systems of the same version with the same updates.
(4) Both systems must have the appropriate TCP/IP ports open.
(5) Both systems must have identical network configurations.
All bridging and network configurations must be exactly the same on both hosts
(6) Shared storage must mount at the same location on source and destination systems.
The mounted directory name must be identical
2.
Export your libvirt image directory
# vim /etc/exports

/var/lib/libvirt/images *.example.com(rw,no_root_squash,sync)
# this should be edit
Mount the shared storage on the destination
mount <storage_host>:/var/lib/libvirt/images /var/lib/libvirt/images
3. Live KVM migration with virsh
virsh migrate --live <GuestName> <DestinationURL>
GuestName
- the name of the guest virtual machine which you want to migrate
DestinationURL
- the connection URL of the destination host physical machine
Example: live migration with virsh
This example migrates from host1.example.com to host2.example.com.
Change the host physical machine names for your environment.
This example migrates a virtual machine named guest1-rhel6-64.
(1) Verify the guest virtual machine is running
virsh list
From the source system, host1.example.com, verify guest1-rhel6-64 is running
(2) Migrate the guest virtual machine
virsh migrate --live guest1-rhel7-64 qemu+ssh://host2.example.com/system --verbose
Append /system to the end of the destination URL to tell libvirt that you need full access
(3) Wait
- The migration may take some time depending on load and the size of the guest virtual machine.
- virsh only reports errors.
- The guest virtual machine continues to run on the source host physical machine until fully migrated.
(4) Verify the guest virtual machine has arrived at the destination host
virsh list
From the destination system, host2.example.com, verify guest1-rhel7-64 is running
Note: Non-running guest virtual machines cannot be migrated with the virsh migrate command.
To migrate a non-running guest virtual machine, the following script should be used
virsh -c qemu+ssh://<target-system-FQDN> migrate --offline --persistent
4. MIGRATING WITH VIRT-MANAGER
This section covers migrating a KVM guest virtual machine with virt-manager from one host physical machine to another.
(1) Open virt-manager
(2) Connect to the target host physical machine
(3) Add connection
(4) Migrate guest virtual machines
(5) Optional - View the storage details for the host physical machine